4 posts tagged with "jupyter"

View All Tags

· 6 min read
Eléonore Charles

In the realm of AI, data science, and machine learning, Jupyter Notebooks are highly valued for their interactive capabilities, enabling users to develop with immediate feedback and iterative experimentation.

However, as models grow in complexity and datasets expand, the need for powerful computational resources becomes critical. Traditional setups often require significant adjustments or sacrifices, such as migrating code to different platforms or dealing with cumbersome configurations to access GPUs. Additionally, often only a small portion of the code requires GPU acceleration, while the rest can run efficiently on local resources.

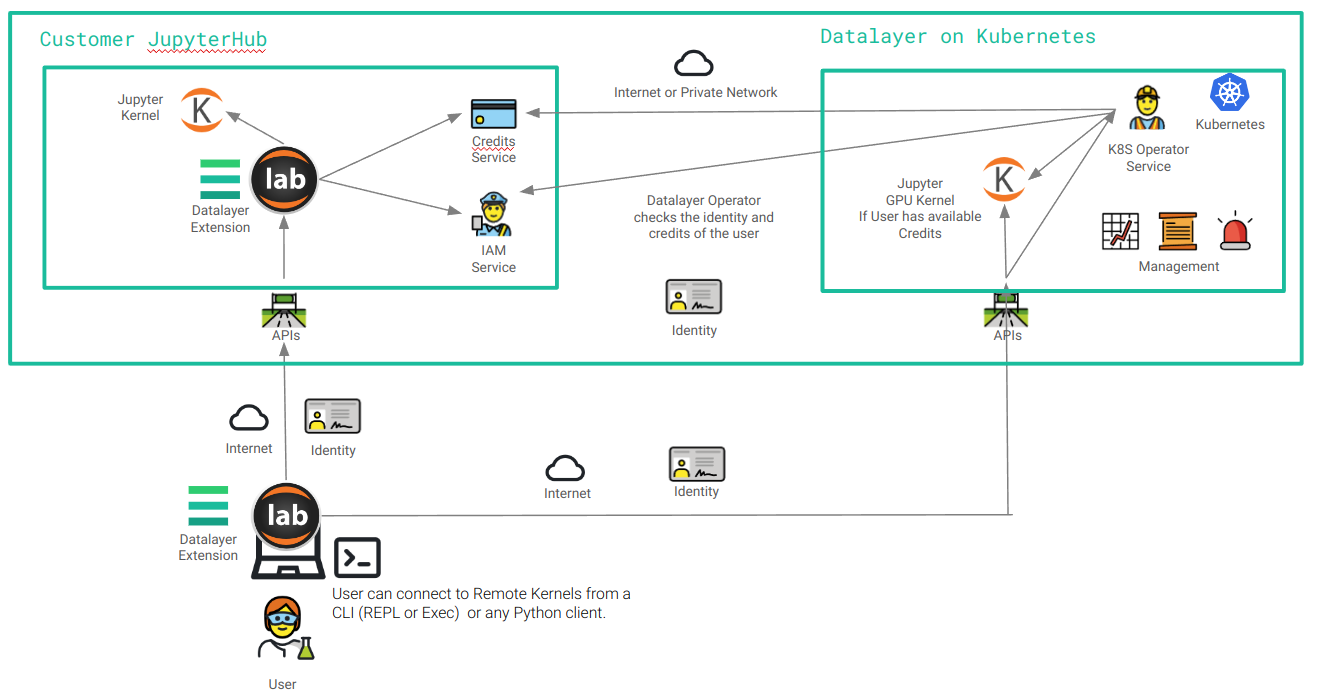
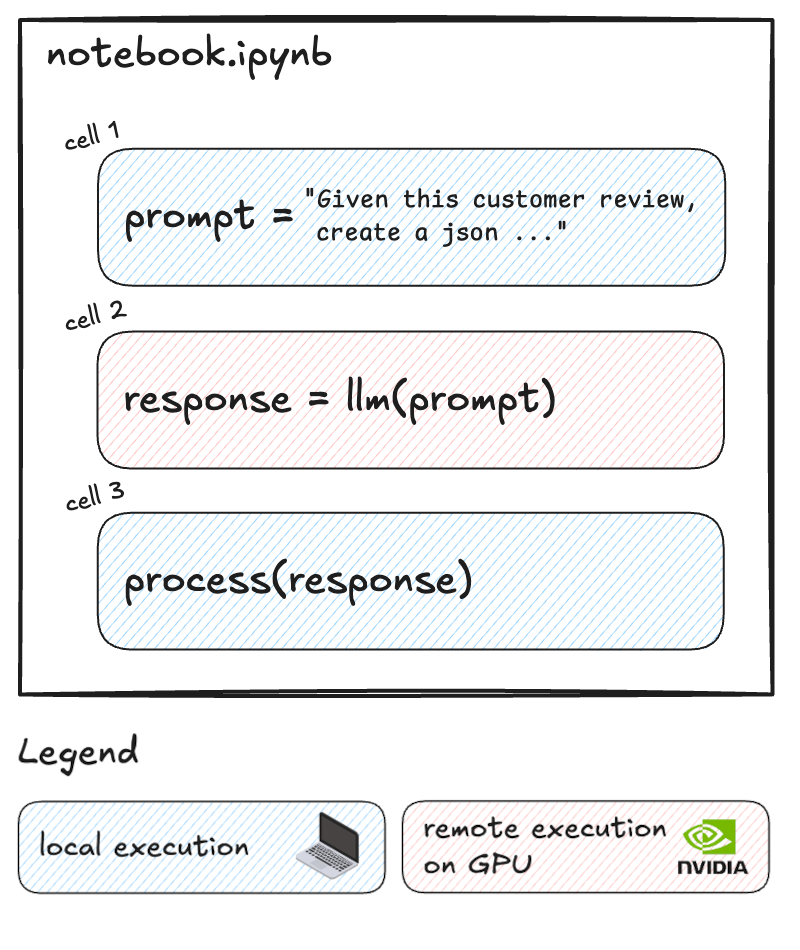
What if you could selectively run resource-intensive cells on powerful remote GPUs while keeping the rest of your workflow local? That’s exactly what Datalayer Cell Kernels feature enables. Datalayer works as an extension of the Jupyter ecosystem. With this innovative approach, you can optimize your cost without disrupting your established processes. We’re excited to show you how it works.

The Power of Selective Remote Execution

Datalayer Cell Kernels introduce a game-changing capability: the ability to run specific cells on remote GPUs while keeping the rest of your notebook local. This selective approach offers several advantages:

  1. Cost Optimization: Only use expensive GPU resources when absolutely necessary.
  2. Performance Boost: Accelerate computationally intensive tasks without slowing down your entire workflow.
  3. Flexibility: Seamlessly switch between local and remote execution as needed.

Let's dive into a practical example to see how this works. We'll demonstrate this hybrid approach using a sentiment analysis task with Google's Gemma-2 model.

Create the LLM Prompt

We start by creating our prompt locally. This part of the notebook runs on your local machine:

prompt = """
Analyze the following customer reviews and provide a structured JSON response for each review. Each response should contain:

- "review_id": A unique identifier for each review.
- "themes": A dictionary where each key is a theme or topic mentioned in the review, and each value is the sentiment associated with that theme (positive, negative, or neutral).

Format your response as a JSON array where each element is a JSON object corresponding to one review. Ensure that the JSON structure is clear and easily parseable.

Customer Reviews:

1. "I love the smartphone's performance and speed, but the battery drains quickly."
2. "The smartphone's camera quality is top-notch, but the battery life could be better."
3. "The display on this smartphone is vibrant and clear, but the battery doesn't last as long as I'd like."
4. "The customer support was helpful when my smartphone had issues with the battery draining quickly. The camera is ok, not good nor bad."

Respond in this format:
[
{
"review_id": "1",
"themes": {
"...": "...",
...
}
},
...
]
"""

Analyse Topics and Sentiment on Remote GPU

Now, here's where we leverage the remote GPU. This cell contains the code to perform sentiment analysis using the Gemma-2 model and the Hugging Face Transformers library. We'll switch to the remote kernel for just this cell:

from huggingface_hub import login
from transformers import AutoTokenizer, AutoModelForCausalLM
import torch

# Login to Hugging Face
login(token="HF_TOKEN")

# Load the tokenizer
tokenizer = AutoTokenizer.from_pretrained("google/gemma-2-2b-it")

# Load the model
model = AutoModelForCausalLM.from_pretrained(
"google/gemma-2-2b-it",
device_map="auto",
torch_dtype=torch.bfloat16,
)

# Prepare the prompt
chat = [{"role": "user", "content": prompt},]

# Generate the prompt and perform inference
prompt = tokenizer.apply_chat_template(chat, tokenize=False, add_generation_prompt=True)
inputs = tokenizer.encode(prompt, add_special_tokens=False, return_tensors="pt")
outputs = model.generate(input_ids=inputs.to(model.device), max_new_tokens=2000)

# Decode the response, excluding the input prompt from the output
prompt_length = inputs.shape[1]
response = tokenizer.decode(outputs[0][prompt_length:])

By executing only this cell remotely, we're optimizing our use of GPU resources. This targeted approach allows us to tap into powerful computing capabilities precisely when we need them, without the overhead of running our entire notebook on a remote machine.

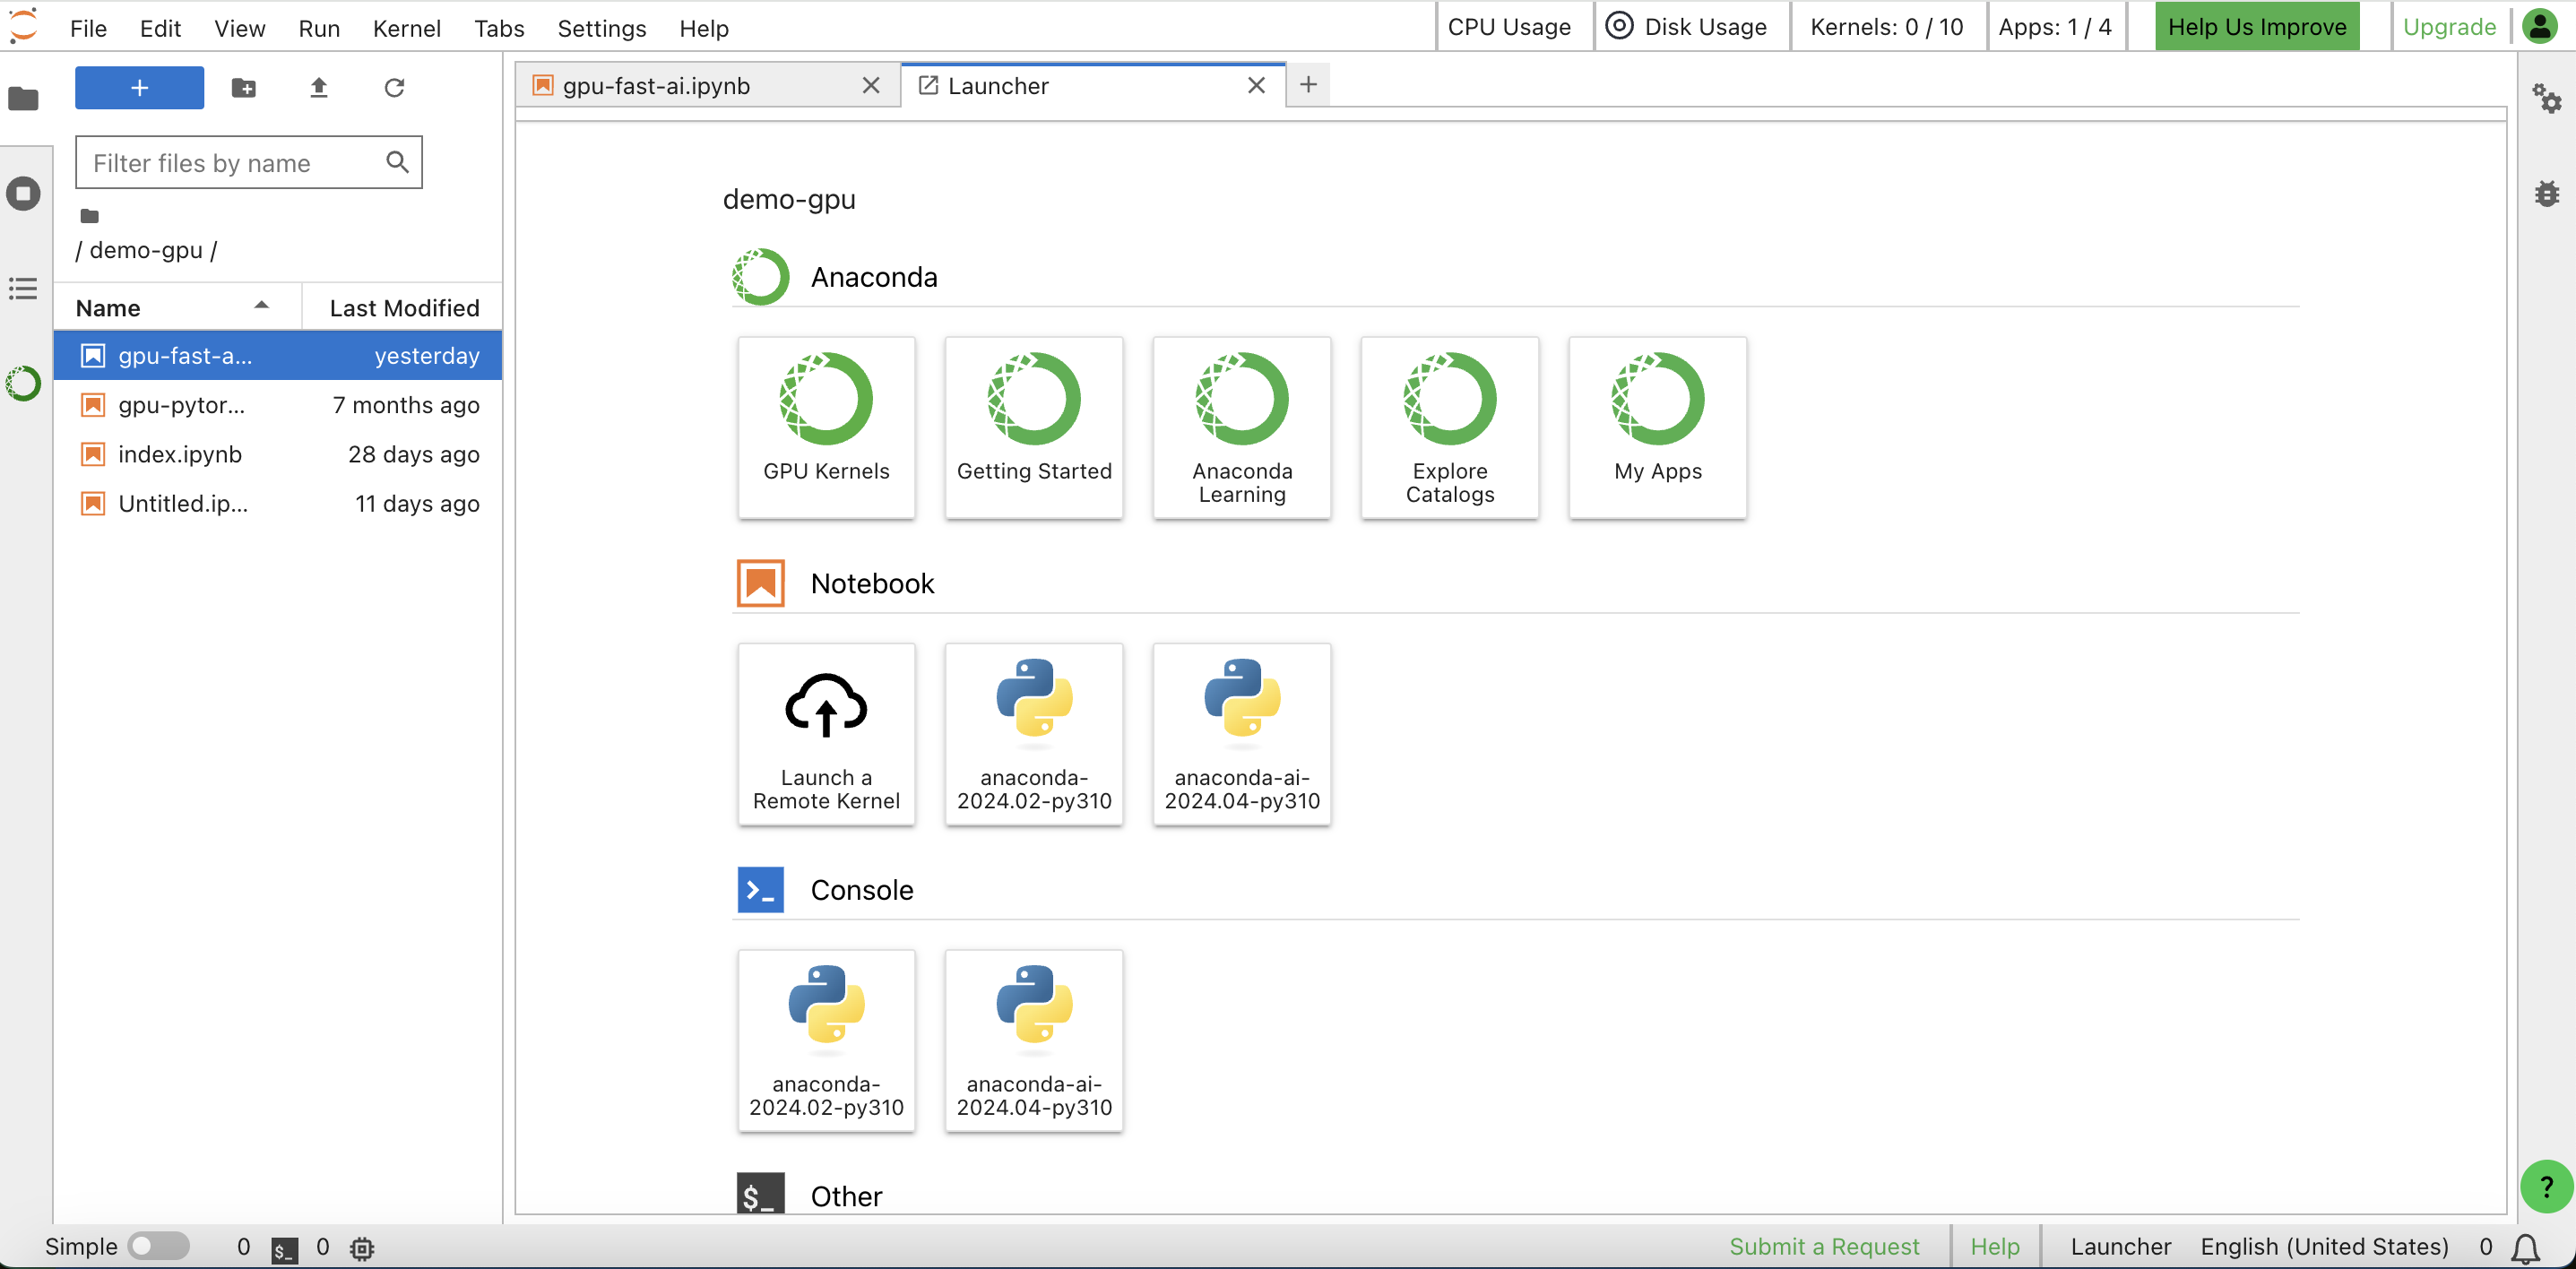
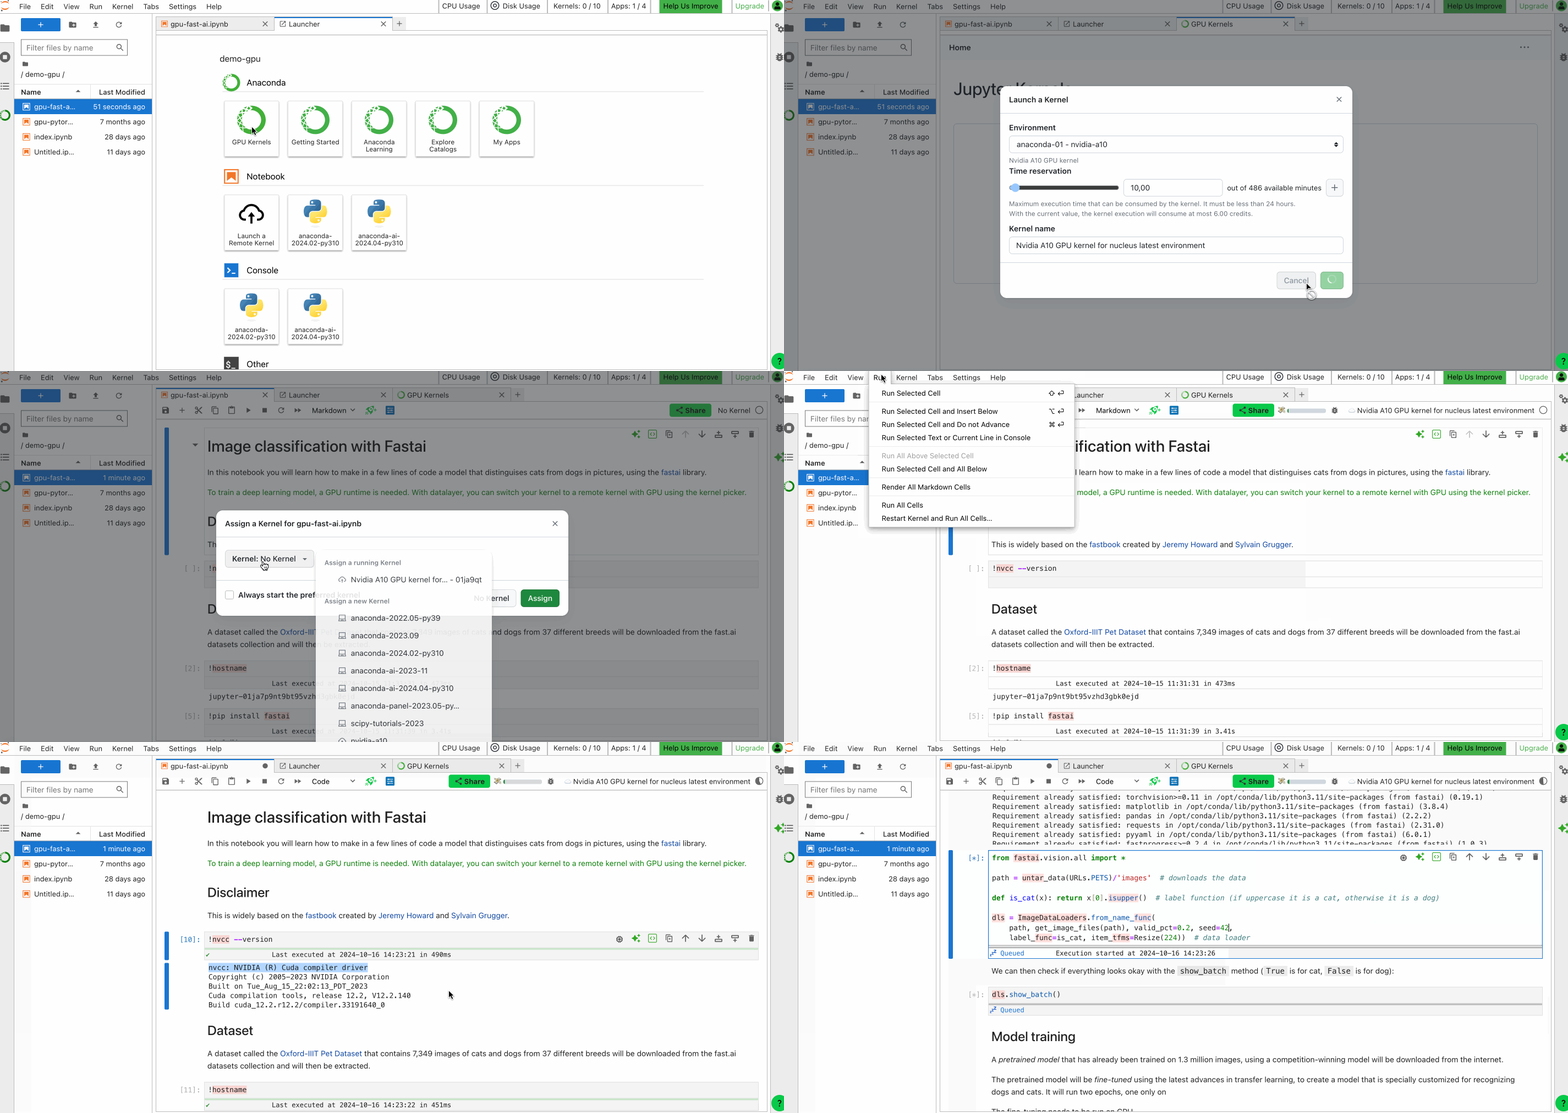
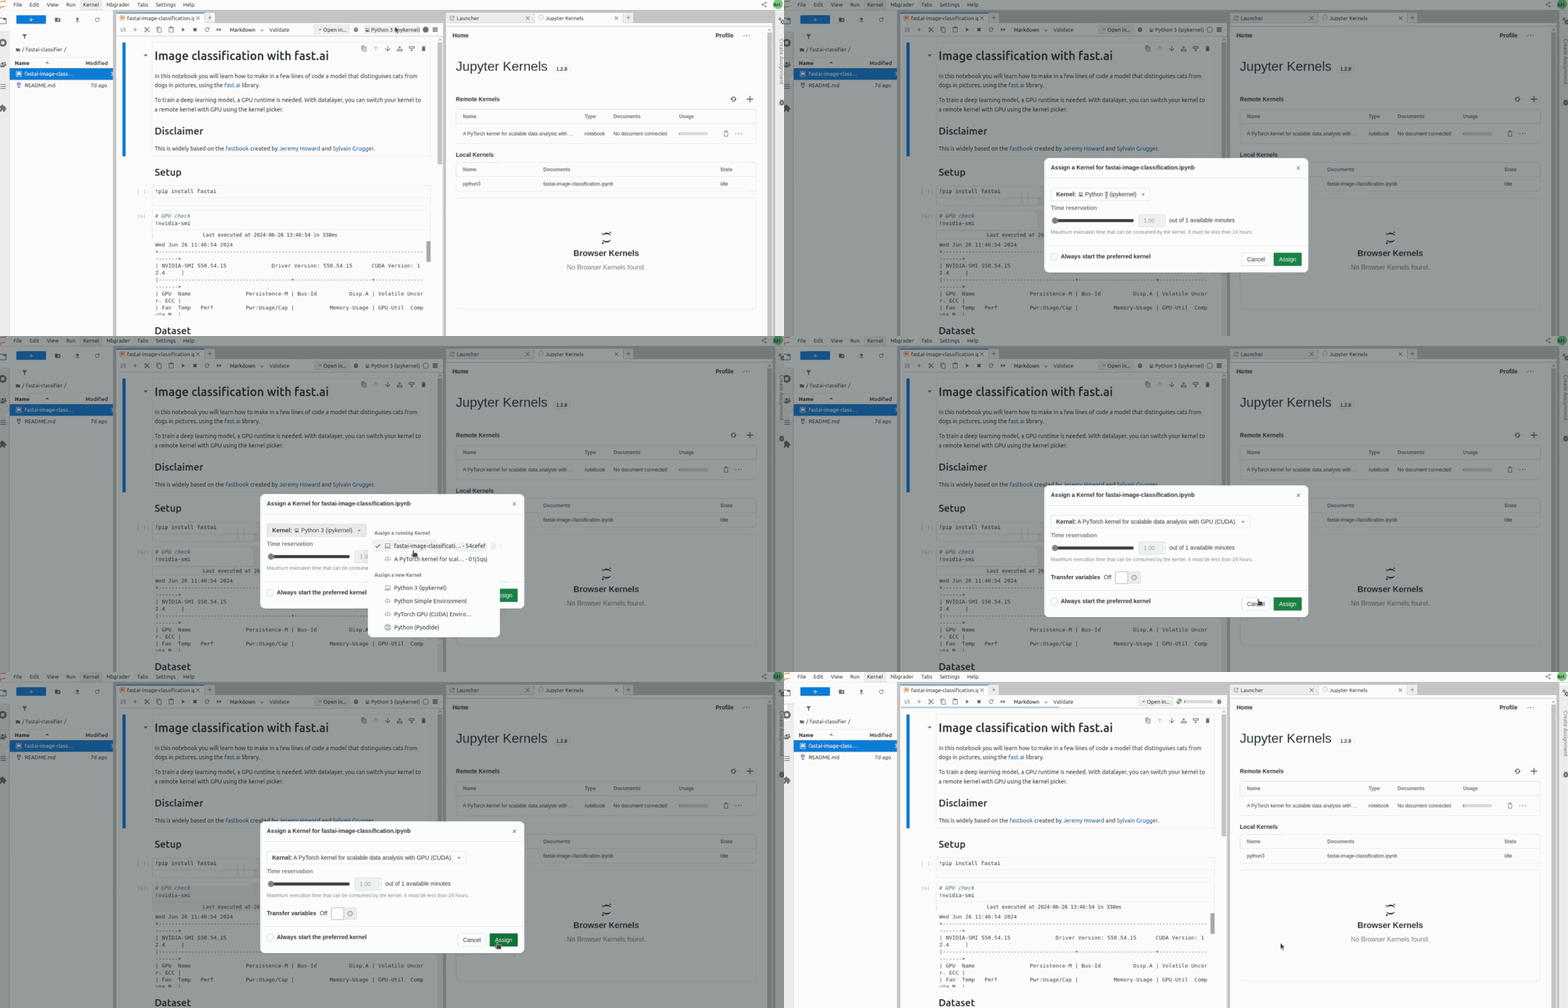
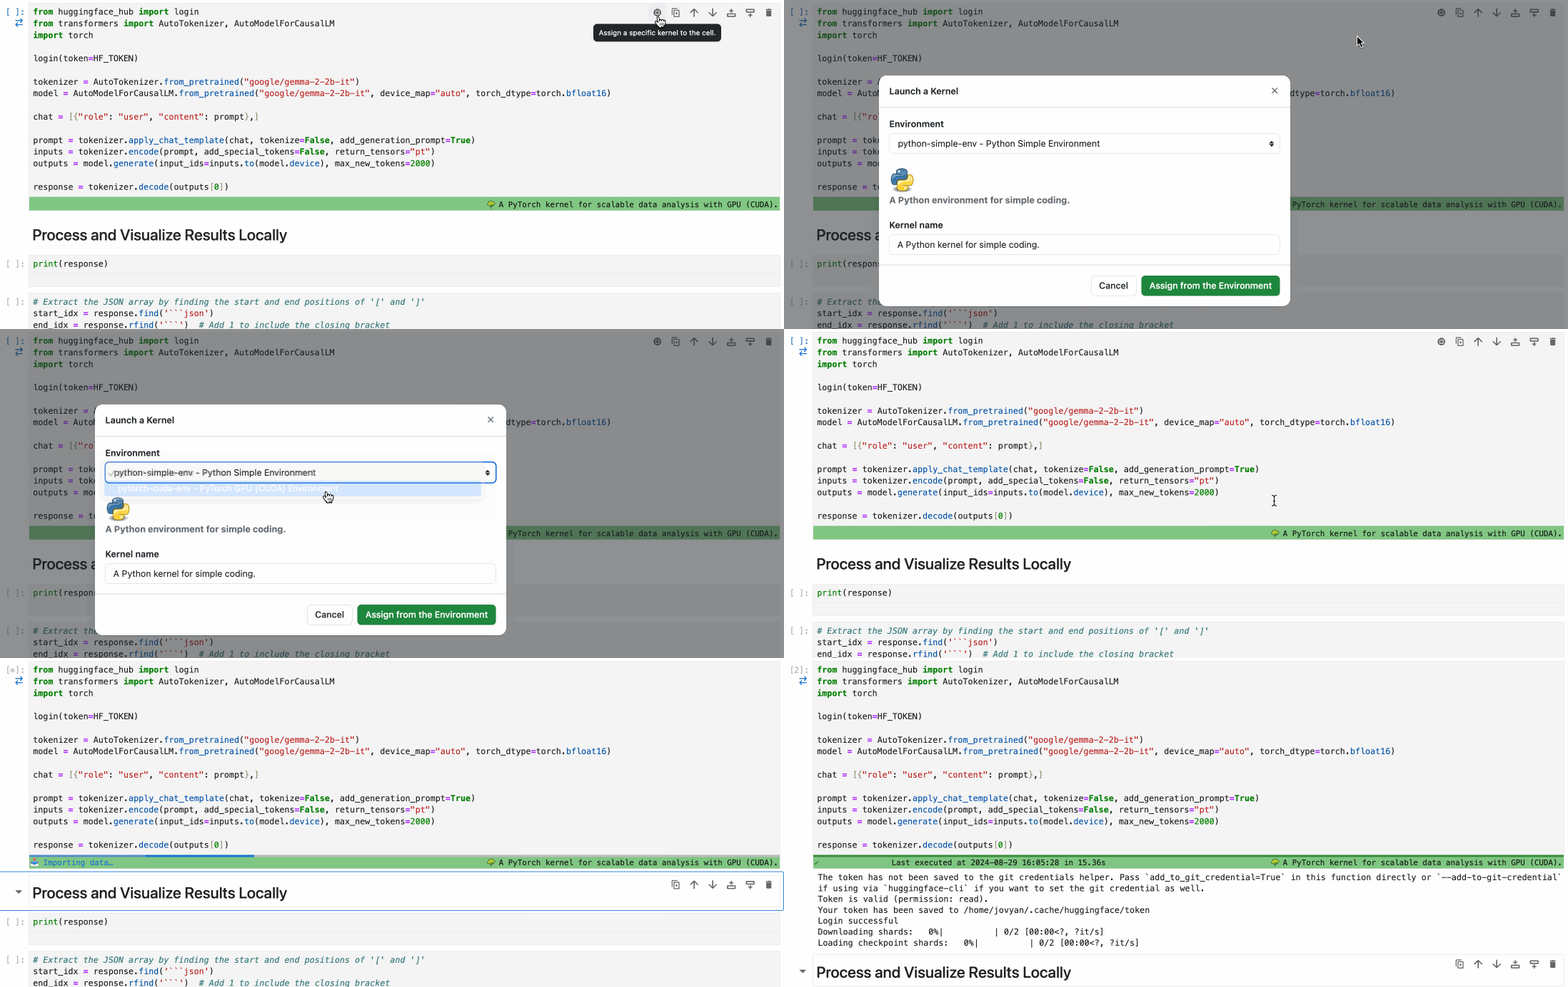
To execute this cell on a remote GPU, you just have to select the remote environment for this cell.

This is done with just a few clicks, as shown below:

With a simple selection from the cell dropdown, you can seamlessly transition from local to remote execution.

info

Using a Tesla V100S-PCIE-32GB GPU, the sentiment analysis task completes on average in 10 seconds. The number of tokens/seconds processed is ± 19.

The model was pre-downloaded in the remote environment. This was done to eliminate download time. Datalayer lets you customize your computing environment to match your exact needs. Choose your hardware specifications and install the libraries and models you require.

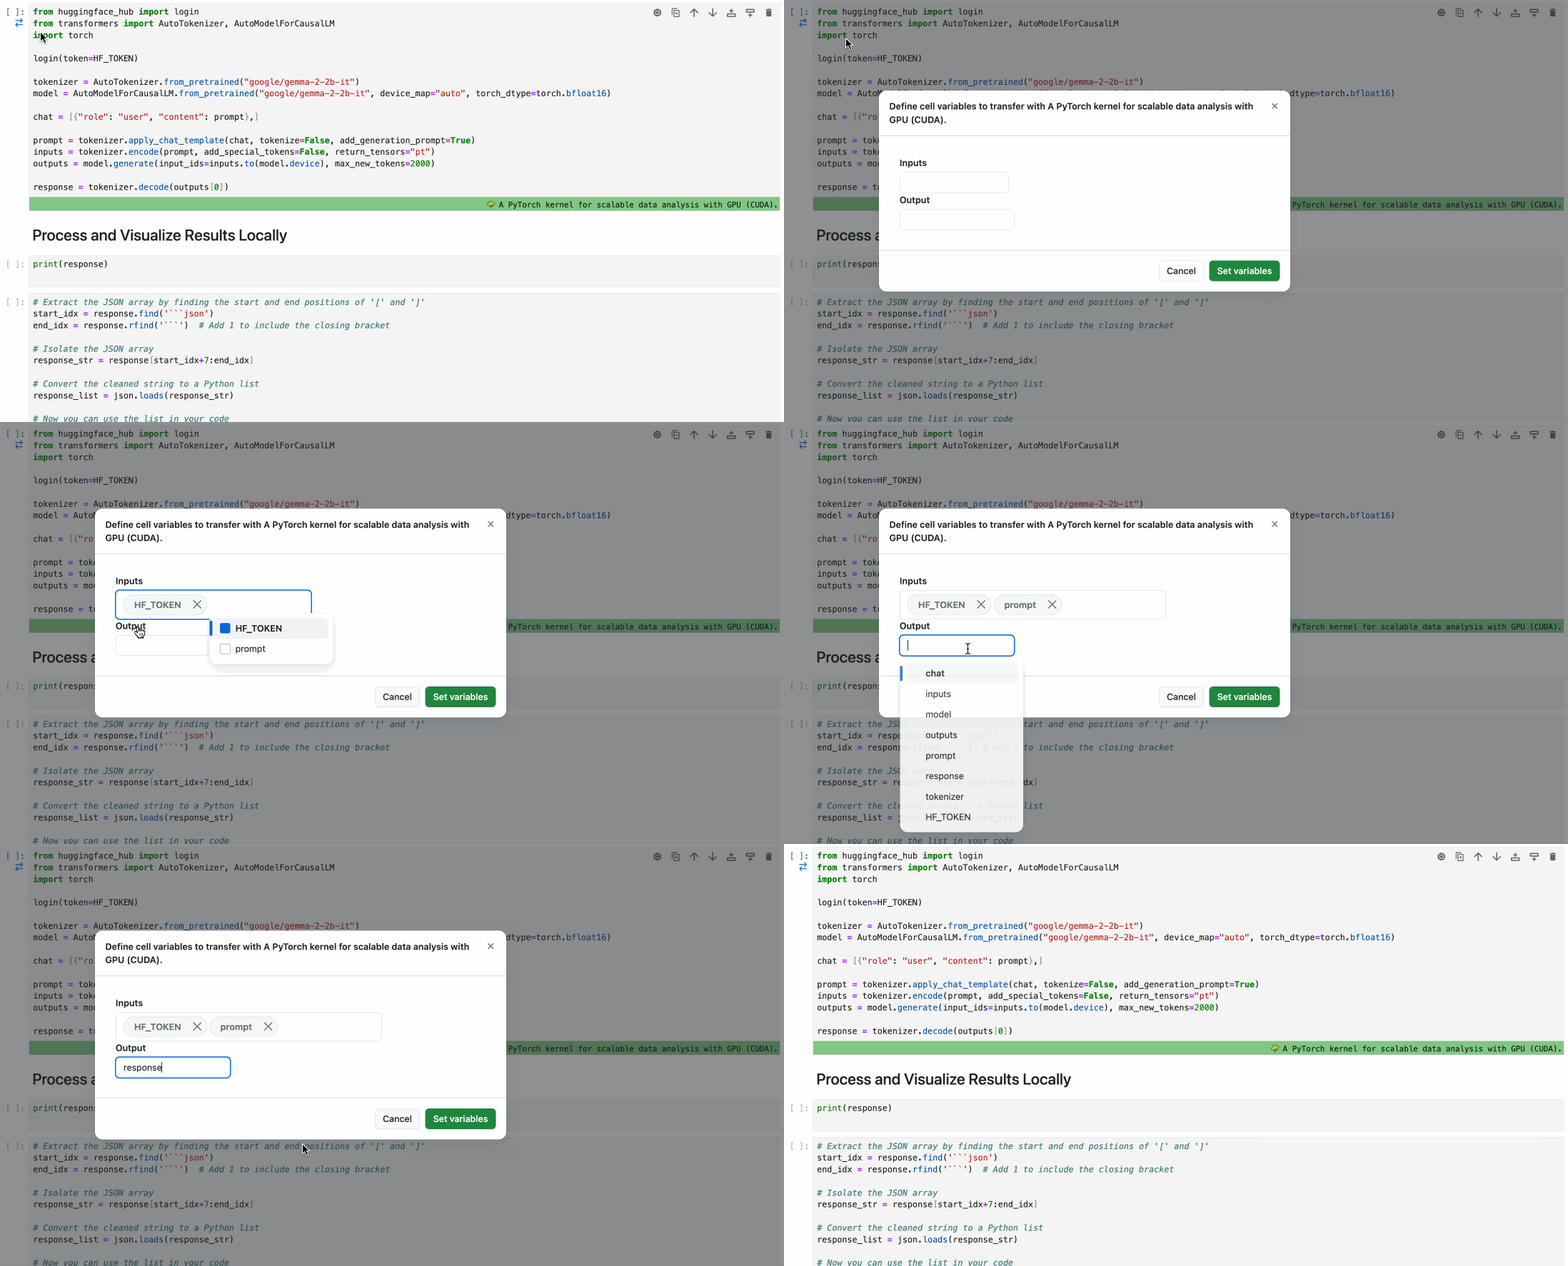
Datalayer Cell Kernels allow you to manage variable transfers between your local and remote environments. You can easily configure which variables should be passed from your local setup to the remote kernel and vice versa, as illustrated below:

This ensures that your remote computations have access to the data they need and that your local environment can utilize the results of remote processing.

note

Variable transfers are currently limited to 7 MB. This limit is expected to increase in the future, and the option to add data to the remote environment will also be introduced.

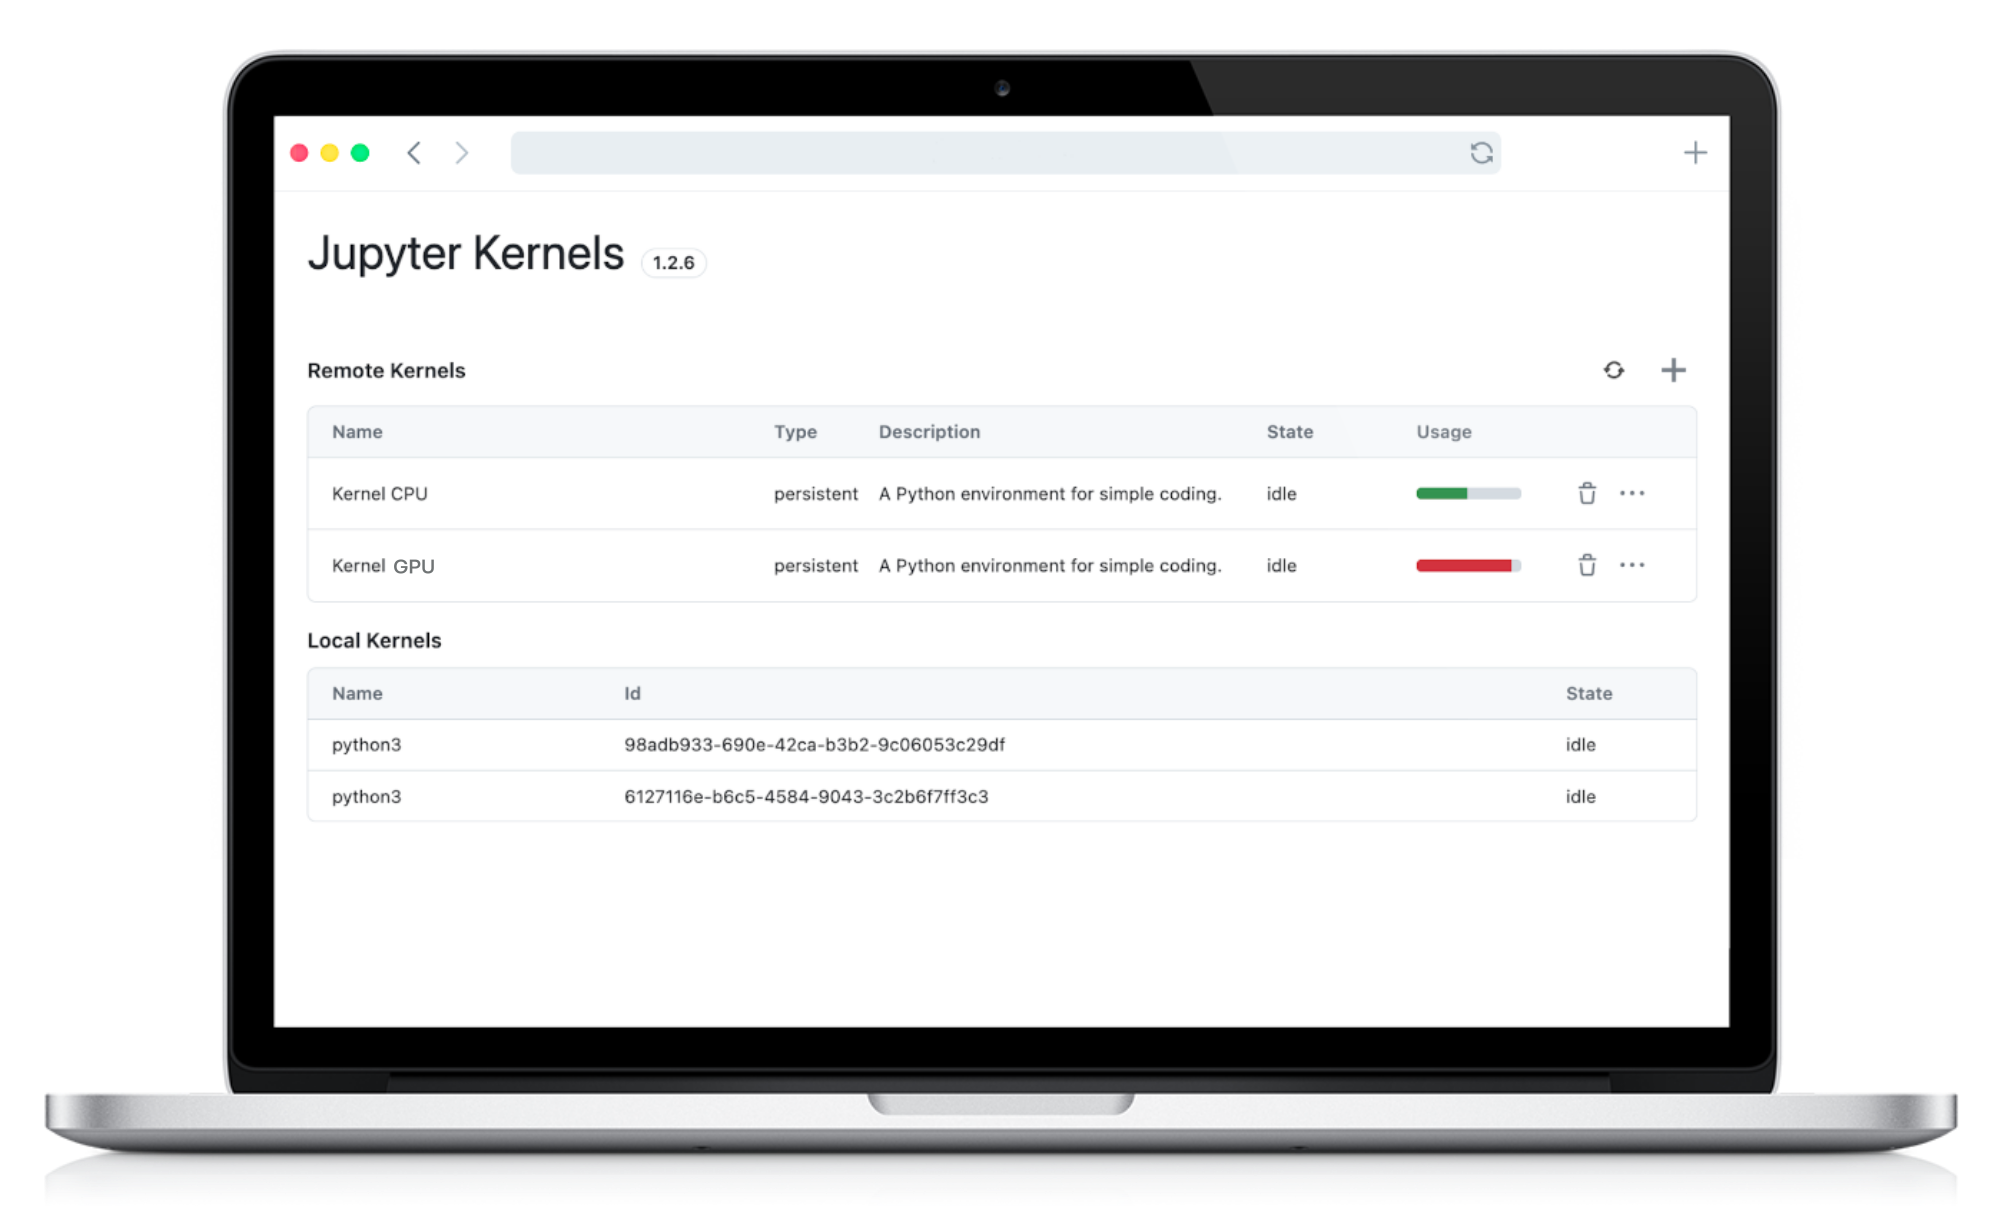
To help you monitor and optimize your resource usage, Datalayer provides a clear and intuitive interface for viewing remote kernel usage.

Process and Visualize Results Locally

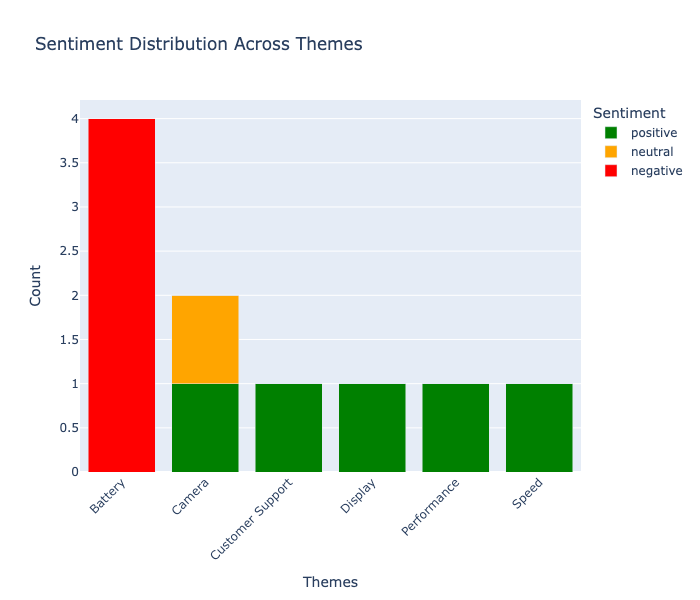
We switch back to local execution for processing and visualizing the results. This is the processed list of themes and sentiments extracted from the reviews by the Gemma-2 model:

[
{
'review_id': '1',
'themes': {'performance': 'positive', 'speed': 'positive', 'battery': 'negative'}
},
{
'review_id': '2',
'themes': {'camera': 'positive', 'battery': 'negative'}
},
{
'review_id': '3',
themes': {'display': 'positive', 'battery': 'negative'}
},
{
'review_id': '4',
'themes': {'customer support': 'positive', 'camera': 'neutral', 'battery': 'negative'}
}
]

And below is a visualization of the theme and sentiment distribution across the reviews:

Key Takeaways

Datalayer Cell Kernels allow you to selectively run specific cells on remote GPUs. This hybrid approach optimizes both performance and cost by using remote resources only when necessary. Complex tasks like sentiment analysis with large language models become more accessible and efficient.

Check out the full notebook example and sign up on the Datalayer waiting list today and be among the first to experience the future of hybrid Jupyter workflows!

· 7 min read
Eric Charles

We are thrilled to announce the 0.0.6 release of Datalayer. This release improves the data analytics user and developer experience with Jupyter React, a javascript library to ensure React.js is a first-class citizen in the Jupyter ecosystem.

Jupyter React is built on top of JupyterLab which aims to be the next default notebook for Python data scientists and is actively developed. However, some users sill prefer the classic notebook and JupyterLab is not yet mainstream... The following points can be the identified as the source of the shadow:

  1. The user interface is intimidating and quite complicated. An initiative to strip-down the user interface has been taken with Retrolab, but the result still looks pretty much like JupyterLab without visible value compared to the classic notebook. Users will even loose some beloved features like their preferred keyboard shortcuts, VIM mode, performance...
  2. The extensions ecosystem is rich but breaking changes in the core of JupyterLab have made the overall ecosystem fragile and subject to failures on installation.
  3. The overall performance (startup time, load large notebook, switch tabs...) is know to be degraded on JupyterLab.
  4. The recently merged realtime collaboration feature is solely not usable with a real multi-user authentication and authorization system.
  5. As developer, the Lumino widget toolkit which backs JupyterLab user interface is hard to use and looks pretty much like a Qt toolkit rather than like a modern javascript e.g. React.js, Vue.js, Svelte...
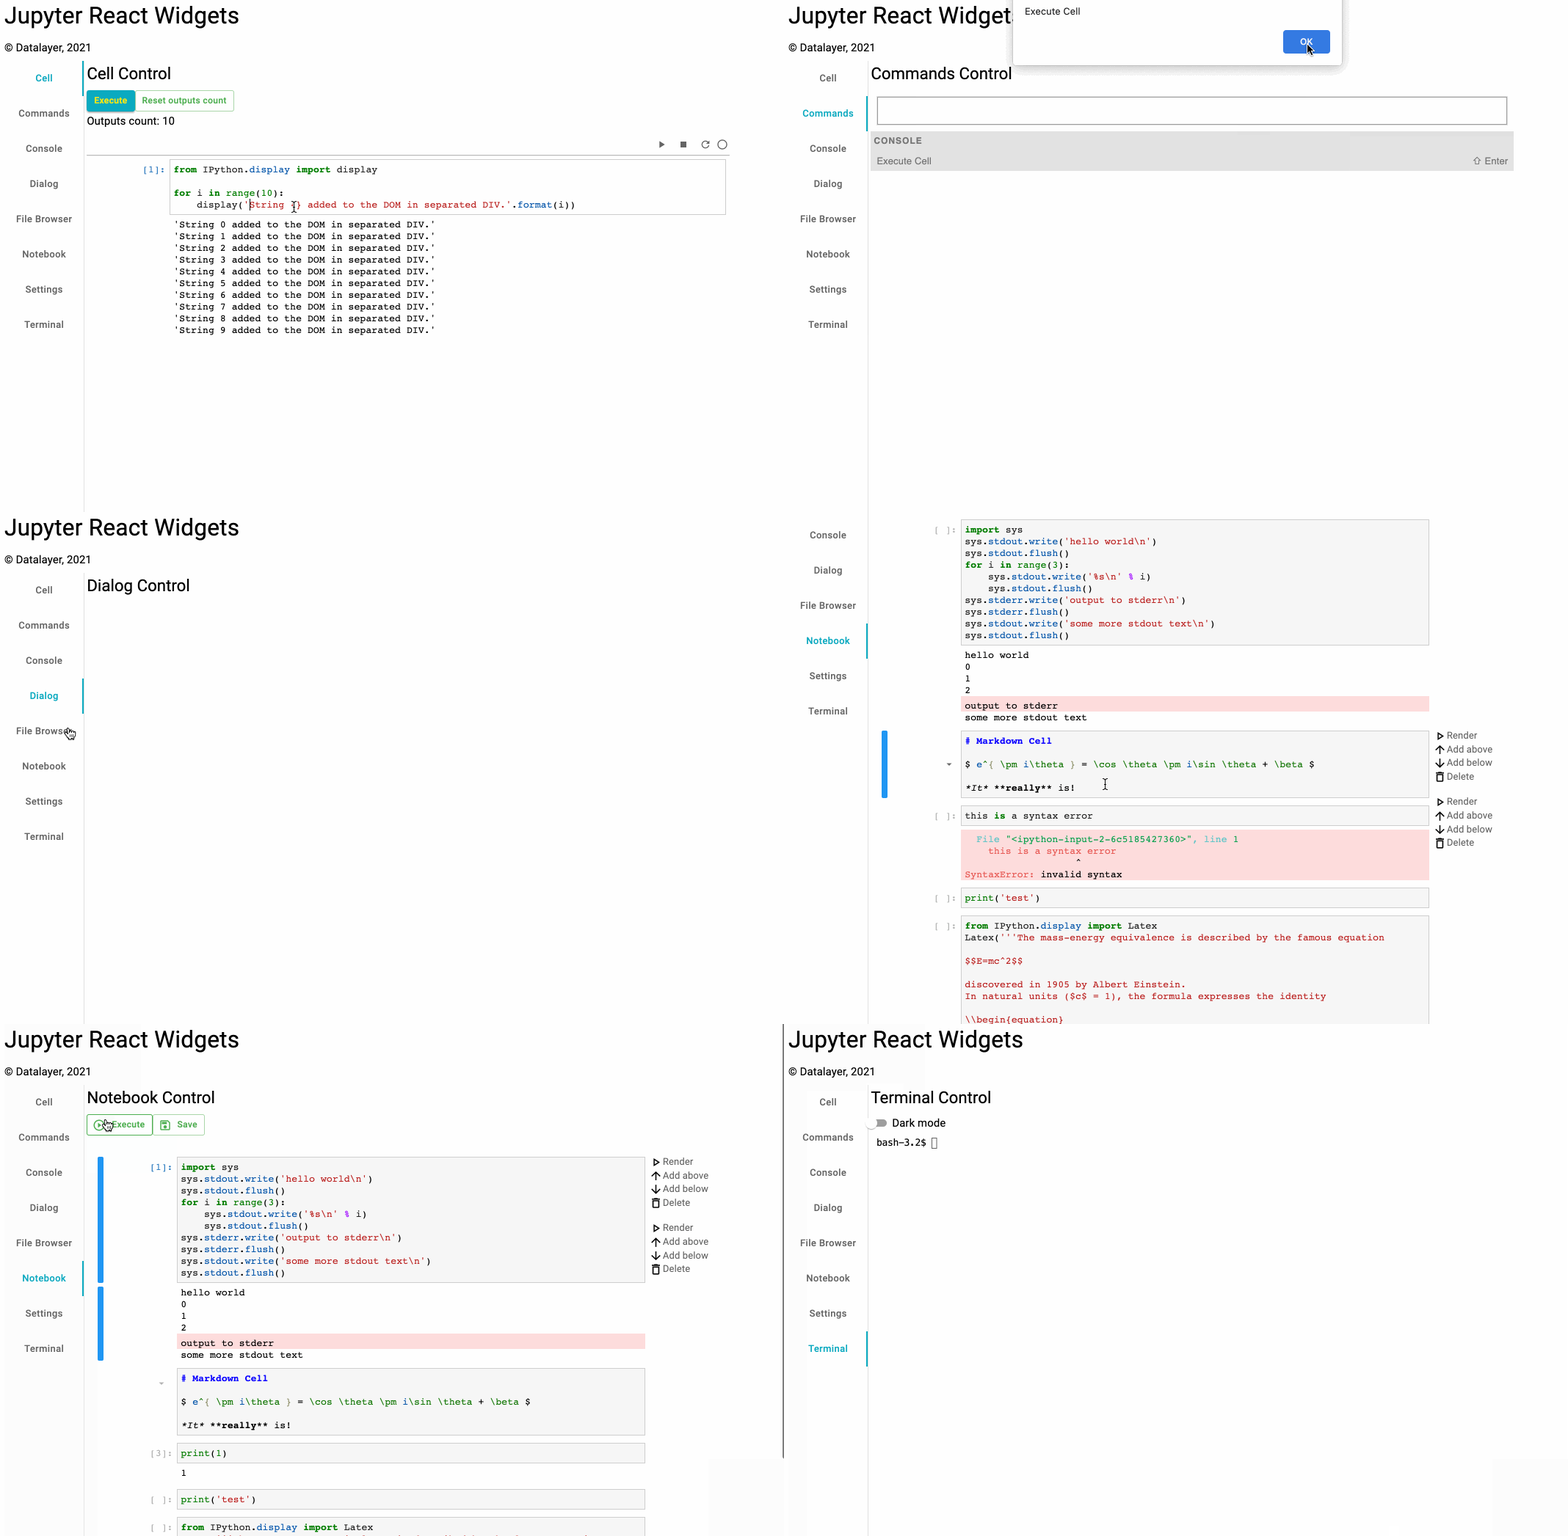
Jupyter React Widgets Gallery

· 4 min read
Eric Charles

All Data Scientists know that story... Install the well-known Jupyter Classic or JupyterLab Notebook on their local PC/laptop, pip install some python libraries like pandas..., download some datasets and finally start analysing with a notebook in isolation. There are a few pain points there:

  1. Setting up the tools is hard and time consuming. You have to install Python, Jupyter and add the libraries you need. Conda environments or Docker containers can help mitigate the pain at some point, but finally these are yet additional tools to setup and manage.
  2. At some point, they want to collaborate with teammates, or want to share some results. The Data Scientist is just on his island and has no easy way to break the silo. The recent Realtime collaboration features have been merged into JupyterLab but it is just the permises and miss fundamental building blocks like identity, authorization...
  3. The analysis is not easily reproducible. The setup you have done on a particular Windows platform is completely different from the setup another collaborator may have done on macOS.

More Cloud-native

There comes the need for an better solution. At Datalayer we think that a more Cloud-native Jupyter can help remove those pain points. In other words, we embrasse the infrastructure provided by cloud providers like GCloud, AWS, Azure... and build on top to provide more power to the Data Scientist.

Cloud native computing is an approach in software development that utilizes cloud computing to "build and run scalable applications in modern, dynamic environments such as public, private, and hybrid clouds.
Wikipedia https://en.wikipedia.org/wiki/Cloud_native_computing

· 2 min read
Eric Charles

Since our last blog post on January 2018, we have changed a lot the Datalayer architecture. Back in 2018, we had chosen for Apache Zeppelin for its good integration with Big Data frameworks like Apache Spark and competely replaced the existing Angular.js user interface with a home-brewed React.js implementation to integrate with the Kubernetes Control Plane. While rolling out more and more features on top of our former version 0.0.1, we have been intrigued in February 2018 by JupyterLab being announced to be ready for users. Back in time, in July 2016, JupyterLab was positioned as the next generation of the Jupyter Notebook.